ViewModel Routing with ReactiveUI and Xamarin.Forms
Introduction
In this article we will cover how to navigate from one view to another, using ReactiveUI routing. For our example, we will allow the user to select an article from our article list, which in turn will navigate to the article detail view.
Setup
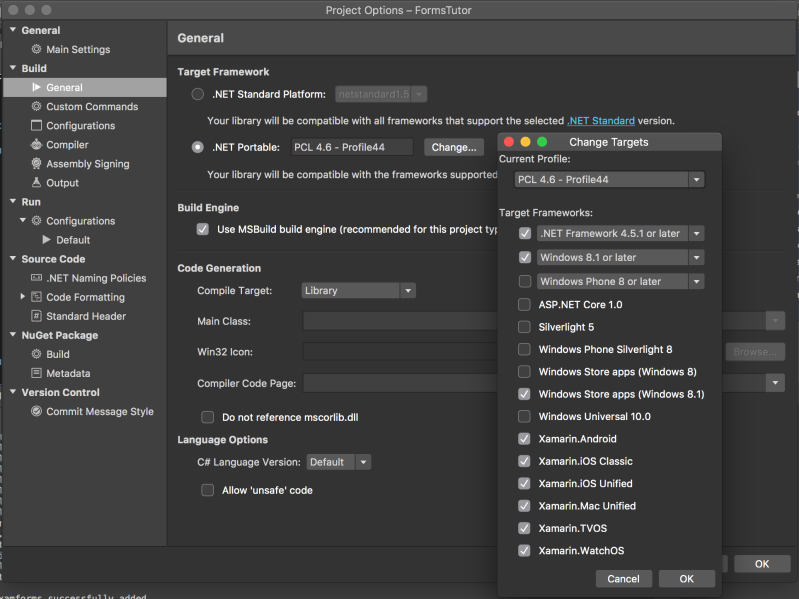
In this article, we are going to be using the ReactiveUI events library for Xamarin.Forms. Before we can add the necessary references we need to change the PCL profile of our FormsTutor PCL project to Profile44. In order to do this simply go into your project settings for the FormsTutor project and go to Build > General.
Once you've completed updating the project's PCL profile, you should install the reactive-events-xamforms NuGet package into your PCL project.
Routable ViewModels
Before we can use the ReactiveUI router we need to make our ViewModels routable. To do this, we simply need to add the IRoutableViewModel interface to our class which requires us to implement the following properties:
IScreen HostScreen {
    get;
}

string UrlPathSegment {
    get;
}
The UrlPathSegment is simply an identifier for your ViewModel. HostScreen is just a reference to an object that manages the routing for our application.
In the following example code, we will implement these two properties in our ArticlesViewModel class:
public string UrlPathSegment => "Articles";

public IScreen HostScreen { get; set; }

public ArticlesViewModel(IScreen hostScreen)
{
    HostScreen = hostScreen;
    ...
}
Creating our Article View
We now need to setup our new article detail view, which will be navigated to from our article list.
ArticlePage.xaml
<?xml version="1.0" encoding="UTF-8"?>
<ContentPage xmlns="http://xamarin.com/schemas/2014/forms" xmlns:x="http://schemas.microsoft.com/winfx/2009/xaml" x:Class="FormsTutor.ArticlePage">
    <ContentPage.Content>
        <WebView x:Name="ArticleContent"></WebView>
    </ContentPage.Content>
</ContentPage>
ArticlePage.xaml.cs
public partial class ArticlePage : ContentPage, IViewFor<ArticleViewModel>
{
    public ArticlePage()
    {
        InitializeComponent();
    }

    #region ViewModel Setup
    public ArticleViewModel ViewModel { get; set; }
    object IViewFor.ViewModel
    {
        get { return ViewModel; }
        set { ViewModel = (ArticleViewModel)value; }
    }
    #endregion
}
ArticleViewModel.cs
public class ArticleViewModel : ReactiveObject, IEnableLogger, IRoutableViewModel
{
    public string UrlPathSegment => "Article";

    public IScreen HostScreen { get; set; }
    public Article Article { get; set; }

    public ArticleViewModel(IScreen hostScreen, Article article)
    {
        HostScreen = hostScreen;
        Article = article;
    }
}
Bootstrapping our ReactiveUI Application
Before we can start using routing we are going to setup a new class inherited from ReactiveObject which will be using for bootstrapping our application and instantiate our applications router. It is essentially a top level ViewModel that is used for managing the state of our application.
We are also going to refactor our project so that the logging and splat dependancies are setup inside of this new class.
public class AppBootstrapper : ReactiveObject, IScreen
{
    public AppBootstrapper(IMutableDependencyResolver dependencyResolver = null, RoutingState router = null)
    {
        BlobCache.ApplicationName = Configuration.ApplicationName;

        SetupLogging();

        Router = router ?? new RoutingState();

        RegisterParts(dependencyResolver ?? Locator.CurrentMutable);

        Router.Navigate.Execute(new ArticlesViewModel(this));
    }

    private void SetupLogging()
    {
        var logger = new Logger() { Level = LogLevel.Debug };
        Locator.CurrentMutable.RegisterConstant(logger, typeof(ILogger));
        LogHost.Default.Level = LogLevel.Debug;
    }

    public RoutingState Router { get; private set; }

    private void RegisterParts(IMutableDependencyResolver dependencyResolver)
    {
        dependencyResolver.RegisterConstant(this, typeof(IScreen));

        dependencyResolver.Register(() => new ArticlesPage(), typeof(IViewFor<ArticlesViewModel>));
        dependencyResolver.Register(() => new ArticlePage(), typeof(IViewFor<ArticleViewModel>));
    }

    public Page CreateMainPage()
    {
        return new RoutedViewHost();
    }
}
We now need to change our main App class to use our new AppBootstrapper class. We are going setup the default SuspensionHost so that it creates an instance of our new AppBootstrapper class.
The SuspensionHost, helps us manage the state of our ReactiveUI application, during the normal lifecycle events that an application goes through. You can read more about how the SuspensionHost works here:
https://reactiveui.net/docs/handbook/data-suspension/autosuspendhelper
public partial class App : Application
{

    public App()
    {
        InitializeComponent();

        RxApp.SuspensionHost.CreateNewAppState = () => new AppBootstrapper();
        RxApp.SuspensionHost.SetupDefaultSuspendResume();

        MainPage = RxApp.SuspensionHost
                        .GetAppState<AppBootstrapper>()
                        .CreateMainPage();
    }
}
Routing Between ViewModel's
Now that we have our article detail View and ViewModel setup, and our router has been created we can now start routing between our ViewModel's.
We will add a new ReactiveCommand to our ArticlesViewModel that will contain the code for routing to the new article detail View and ViewModel.
public class ArticlesViewModel : ReactiveObject, IEnableLogger, IRoutableViewModel
{
    ...
    public ReactiveCommand<Article, Unit> SelectArticle { get; set; }

    public ArticlesViewModel(IScreen hostScreen)
    {
    ...
           SelectArticle = ReactiveCommand.CreateFromObservable<Article, Unit>(article =>
            {
                HostScreen.Router.Navigate.Execute(new ArticleViewModel(hostScreen, article)).Subscribe();
                return Observable.Return(Unit.Default);
            });
    }
    ...
}
We'll now need to bind the ItemSelected event from our ListView to our new command. The following code uses the Reactive UI Events library to setup this binding.
protected override void OnAppearing()
{
    ...
    Articles.Events()
            .ItemSelected
            .Subscribe(e => ViewModel
                            .SelectArticle
                            .Execute((Article)e.SelectedItem))
            .DisposeWith(_bindingsDisposable);
    ...
}
Summary
In this article, we've covered all the steps required to setup ViewModel routing in ReactiveUI.
There are some platform limitations for using ReactiveUI routing that you should take into consideration, before choosing to use it inside of your application. You can read more about these limitations here:
https://reactiveui.net/docs/handbook/routing/
Full source for this article can be found here:
https://github.com/jamilgeor/FormsTutor/tree/master/Lesson08
References
https://reactiveui.net/docs/handbook/routing/
https://github.com/paulcbetts/XamarinEvolve2014
https://reactiveui.net/docs/handbook/data-suspension/autosuspendhelper